To add the Slice LTI 1.3 tool in Canvas, the tool needs to be configured in the Developer Keys page, followed by being added to an account or course. You may want to complete this set up multiple times to test the setup in both Development and Production environments.
We recommend having the Connect LMS page on Slice open side by side with your Canvas set up so information can be easily copied between the websites.
Open the Connect LMS section on the Slice Account Page.
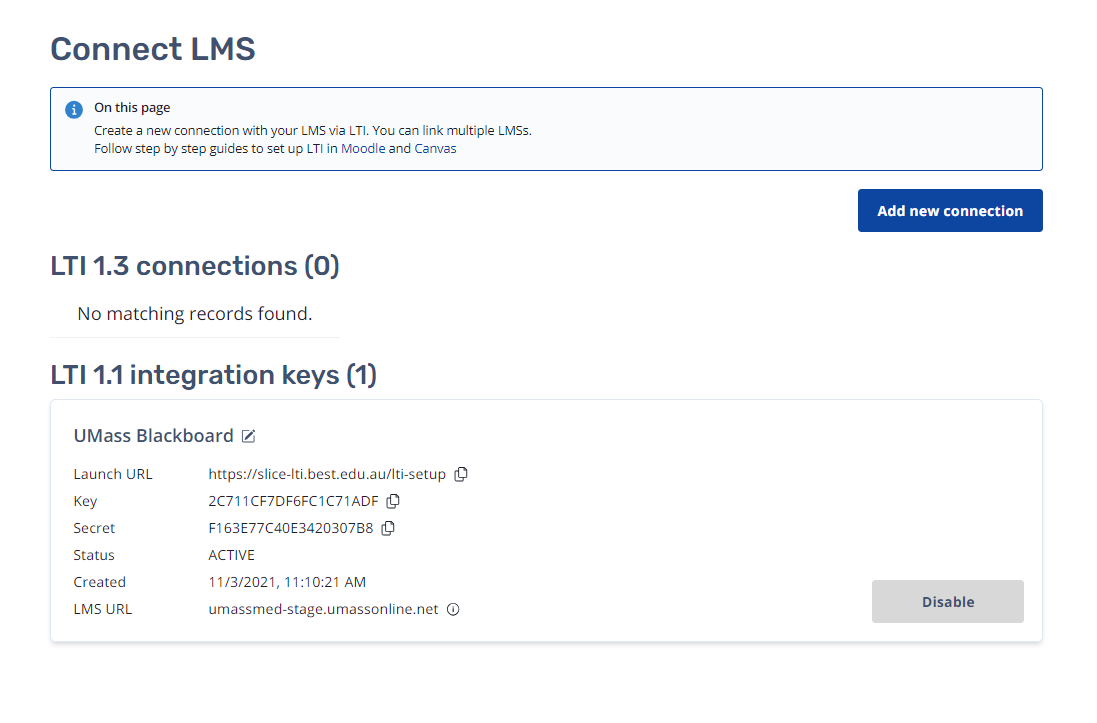
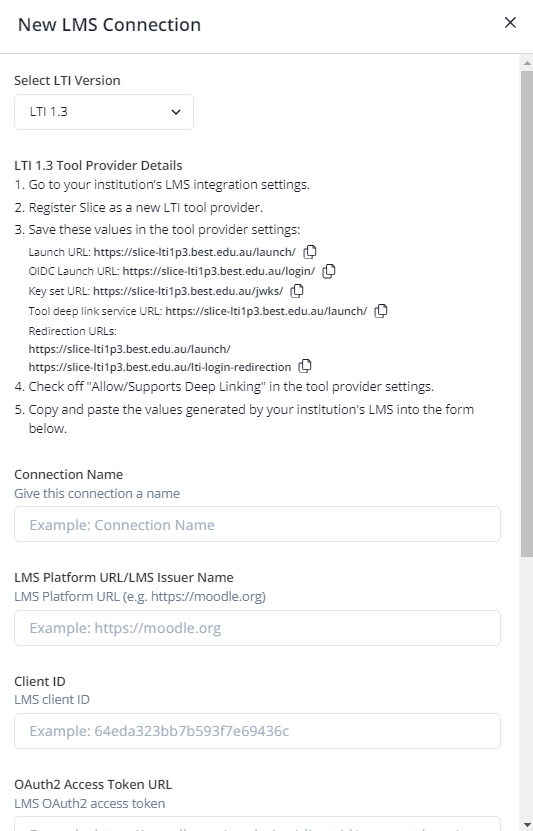
Click the Add New Connection button and choose LTI 1.3. Keep this page open as the information will be required while setting up Canvas.
Within Canvas, locate the Developer Keys page:
- In the left side bar choose Admin and select your Account
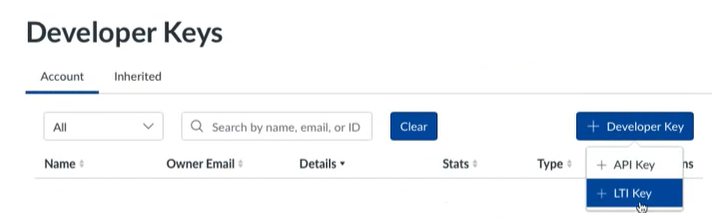
- Choose Developer Keys from the menu
- Click Add Developer Key
- Click Add LTI Key
- On the Configure menu select the Manual Entry method

- Give the LTI 1.3 tool a Key Name and Title that will be recognisable by your institution, for example Slice LTI 1.3
- Provide a description of the tool so that staff understand it's purpose e.g. This tool will launch Slice and allow students to sign in to view images and participate in activities.
- Enter the information from the Connect LMS page from Slice in the appropriate fields as listed below:
Add the Launch URL to the Target Link URI field
OIDC Launch URL to the OpenID Connect Initiation Url field
For the JWK Method choose Public JWK URL
Enter the Key set URL to the Public JWK URL field
Redirection URLs to the Redirect URLs field - Open Additional Settings
Add the Icon URL as: https://slice.best.edu.au/s/img/SMALL.png
Set the Privacy level as Public - In Placements, have Link Selection chosen
- Open Link Selection
Change the Select Message Type to LtiDeepLinkingRequest
Enter the Tool deep link service URL to the Target Link URL field
Add the Icon URL as: https://slice.best.edu.au/s/img/SMALL.png - Click Save.
- After the developer keys page is saved, change the state of the tool to on. The state of the LTI Key indicates if the Client ID for the associated tool can be added to an account or course.
- Copy the Client ID over to the Client ID field in the New LMS Connection window on Slice. (Note that the Client ID is likely a long number with a lot of zeroes in the middle.)

-
In the left hand menu for the Admin page, choose Settings, then Apps.
- Click Add App

- Choose By Client ID for the Configuration Type

- Add the LMS Client ID generated after adding the LTI 1.3 tool
- Click Submit
- Click Install
- Locate the newly created App for Slice in the list and click the settings wheel
- Click Deployment Id and copy the Deployment ID to the Deployment IDs field in the set up page on Slice.

- Click Add App
Return to the set up on Slice
- Fill the Connection Name with a name that is meaningful to your institution, e.g. BEST Network University Production environment
- Fill the LMS Platform URL/LMS Issuer Name field with
https://canvas.instructure.com. It's important to fill it in exactly, even if your actual LMS URL is different - Fill the OAuth2 Access Token URL field with
https://sso.canvaslms.com/login/oauth2/token - Fill the OIDC Auth URL field with
https://sso.canvaslms.com/api/lti/authorize_redirect - Fill the Keyset URL field with
https://sso.canvaslms.com/api/lti/security/jwks - The Client ID should have already been copied in from the Canvas Developer Keys
- Click Save.
Adding a link to Slice within a Course